Disclaimer: any instructions here told are to be followed by the user are their own risk.
Contents
- Hardware
- Software
- Open Sonoff S20
- Connect FTDI-USB adapter
- Flash with Tasmota image
- Test upload
- Set up your newly flashed Sonoff S20!
- Remote Control
- Inside your home WIFI
- From outside your home WIFI
- Troubleshooting
IMPORTANT: DO NOT PLUG your Sonoff device into a mains socket at any point during programming!
WARNING: Ensure your FTDI-USB driver provides a 3.3V (volts) power source, not 5V, as otherwise it may fry your Sonoff device.
Required tools
Hardware
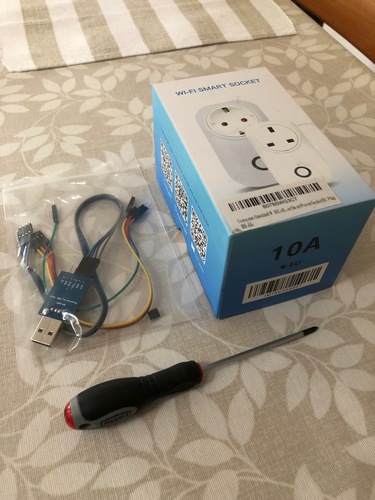
Flashing tools
- A Sonoff S20 Smart Socket! (The one pictured is of the european socket variety, though any Sonoff S20 appropriate to your usage will do.)
- Screwdriver to open/close the Sonoff case
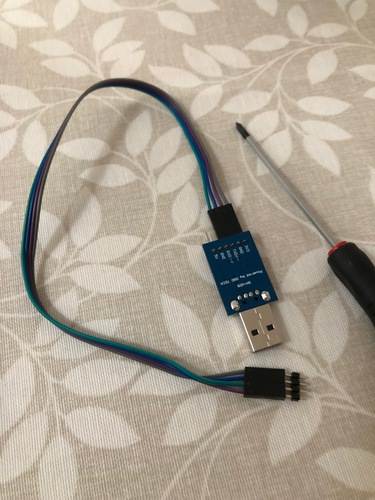
- FTDI driver supporting 3.3V (volts) (some only support 5V)
- Cables to connect the FTDI driver to the Sonoff board
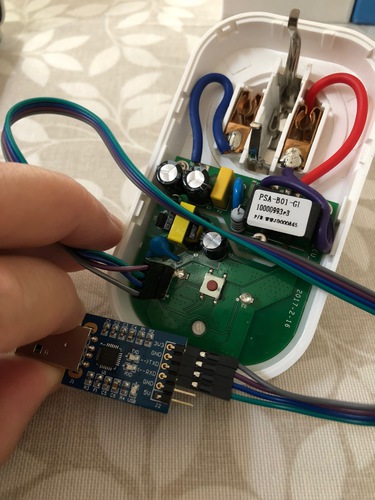
- Connecting the cables is a lot easier with pin headers as shown in the picture below (can only just be made out at the opposite end of the wires to the FTDI-USB programmer board)
Pin headers make connecting wires easier
Software
- Sonoff-Tasmota, the open source firmware you will be uploading to your Sonoff device
- Pre-compiled binary can be downloaded from the releases page
- Python 2.x or 3.x (I installed 3.x specifically for this, but the documentation says 2.x should be sufficient)
- Esptool to upload the Tasmota binary to your Sonoff device
- esptool.py can be installed easily using pip (for other installation methods, consult the esptool homepage):
$ pip install esptool - See the Tasmota wiki page on Esptool for details on how to use Esptool to upload Tasmota onto a Sonoff device. These are the instructions I will be following in this tutorial.
- esptool.py can be installed easily using pip (for other installation methods, consult the esptool homepage):
Open Sonoff S20
Once you have all the prerequisites, you are ready to start messing with your Sonoff device. Here is a picture of my unadulterated Sonoff EU S20.
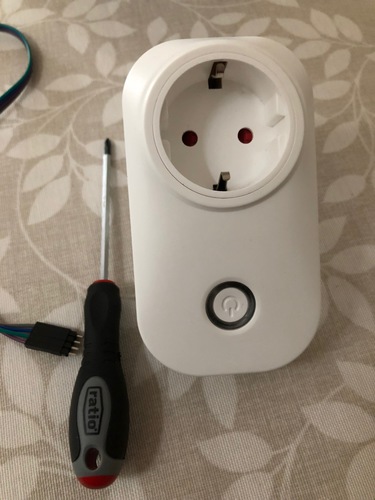
Unadulterated Sonoff EU S20
Get your screwdriver and open up your device to expose the Sonoff PCB board (this could be from one to four screws, depending on the specific Sonoff model).
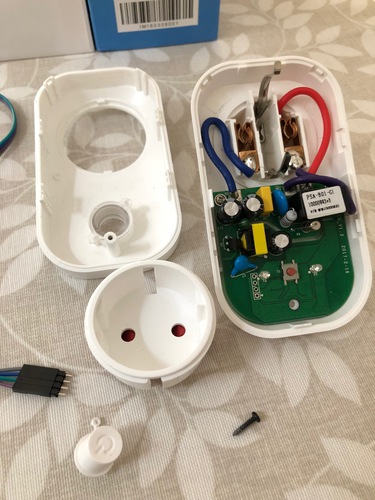
Opened Sonoff S20 ready to play!
Connect FTDI-USB adapter
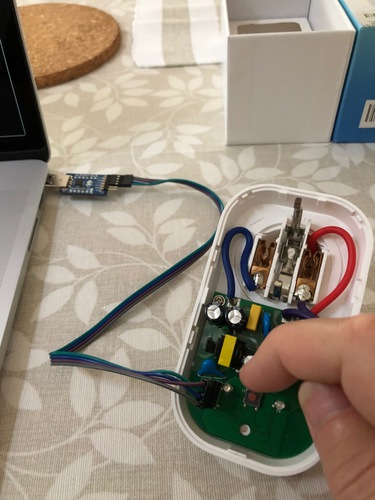
Connecting FTDI-USB adapter to Sonoff board using 3.3V power source
IMPORTANT: DO NOT PLUG your Sonoff device into a mains socket at any point during programming!
WARNING: Ensure your FTDI-USB driver provides a 3.3V (volts) power source, not 5V, as otherwise it may fry your Sonoff device.
You are now ready to connect the FTDI-USB adapter/driver/programmer. This bit can be tricky, as you need to get the RX (receive) and TX (transmit) wires the right way round. It is not the end of the world if you get this wrong, though, as if the upload doesn't work, you just swap those two wires round and try again. What is important, is to ensure you are using a 3.3V (volts) power source, as otherwise you could fry your Sonoff device.
Another important note is: DO NOT PLUG the Sonoff device into a mains socket at any point during the programming!!! Your Sonoff device will get all it's required power during programming from the 3.3V that the FTDI driver will be providing via USB.
You can find the order of the connections on the Tasmota Wiki page for the S20. The hole with the little triangle is always connected to the 3.3V power wire, with the rest connecting to the programmer in order:
- Vcc (3.3V)
- RXD
- TXD
- GND
If you are using the helpful pin headers, you won't even need to take the board out of the plastic housing, like I am doing here. Otherwise, it can be helpful to take a couple of the screws out which are holding the board to the plastic surround, as this allows you to fix the wires into the holes better.
Flash with Tasmota image
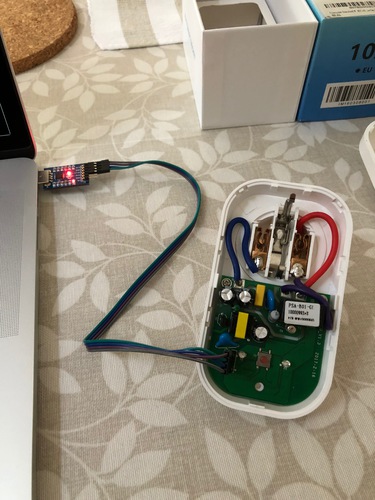
Hold down the central button as you plug into USB port to enable programming mode
Once everything is wired up, you are ready to flash your Sonoff device!
In order to flash the Sonoff, you need to put it into programming mode. This is easy, simply hold down the central button on the board as you plug the FTDI adapter into the USB port on your computer, and keep holding down for about 2 seconds. The device should now be in programming mode!
Literally flashing
Now you need to upload/flash the Tasmota binary (sonoff.bin) you downloaded onto your Sonoff device. I do this on my Mac using the Python based Esptool, as explained on the Tasmota Wiki Esptool page. Make sure you point the esptool.py to the sonoff.bin binary you downloaded from the Tasmota releases page.
This is what a successful upload looked like for me:
$ sudo python3 esptool.py --port /dev/tty.SLAB_USBtoUART write_flash 0x00000 ../sonoff.bin
esptool.py v2.4.0-dev
Connecting....
Detecting chip type... ESP8266
Chip is ESP8266EX
Features: WiFi
Uploading stub...
Running stub...
Stub running...
Configuring flash size...
Auto-detected Flash size: 1MB
Compressed 539040 bytes to 368171...
Wrote 539040 bytes (368171 compressed) at 0x00000000 in 32.4 seconds (effective 132.9 kbit/s)...
Hash of data verified.

Leaving...
Hard resetting via RTS pin...
$
Once the upload finished successfully, you can disconnect from the USB port. Don't pull all the cables out just yet though! The setup will be handy for testing in the next step.
Test upload
You don't need to put everything back together again just yet, as you can test whether the upload has worked by just plugging the USB cable back into your PC. This time, don't hold down the button as you do so, as we only need the USB to provide our Sonoff with 3.3V of power.
To fully test the upload, you can move to the next step, "set up", whilst only powering your Sonoff with the 3.3V.
Set up your newly flashed Sonoff S20!
If all went well, you are ready to set up your Sonoff to connect to your home WiFi. In order to do this from a vanilla installation, which is what we should have after following all of the steps above, you will need to use the button functionality provided by the Tasmota firmware. In particular, we want the 4 short presses option, which makes your Sonoff device start up it's own WiFi Access Point.
Using a WiFi enabled device of your own choosing (I used an iPad, a smartphone should work just as well), go to your WiFi settings and look for an appropriately named WiFi SSID: Sonoff-XXXX, or similar. If you're lucky, once connected it will immediately open up a webpage which will allow you to configure your WiFi details on your device. Otherwise, once you are connected to the Sonoff WiFi, open up a browser on http://192.168.4.1/, which will allow you to set up your home WiFi details on your Sonoff device.
The WiFi configuration page should look something like this:
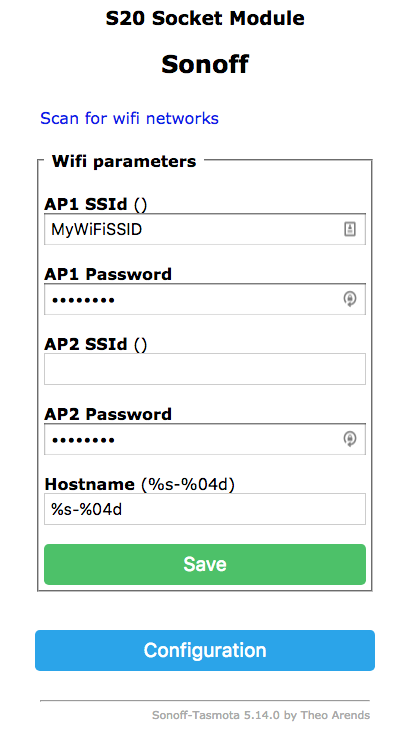
Tasmota WiFi config page
Note that you could change the default hostname from sonoff-xxxx to something more meaningful, like "stairs", or "kitchen", depending on your planned usage for your Sonoff device. Though I must admit that I leave mine as the default name.
Remote Control
Inside your home WIFI
You are now ready to control your Sonoff device remotely (within your own home WiFi)! If you haven't yet done so, put everything back together, taking care to put the Sonoff power button the right way round and keeping it within its little pin holders. You can now plug the Sonoff into the mains, and stand well back! (Only joking. ;-)
To control remotely, you can either use HTTP commands, or MQTT. I plan to explore MQTT myself at some point, but I currently just use the HTTP commands, as they are easy, and fit my current needs.
To use HTTP, open a browser and browse to http://<your-sonoff-hostname>.local/ and take things from there.
Here is what the main menu screen should look like:
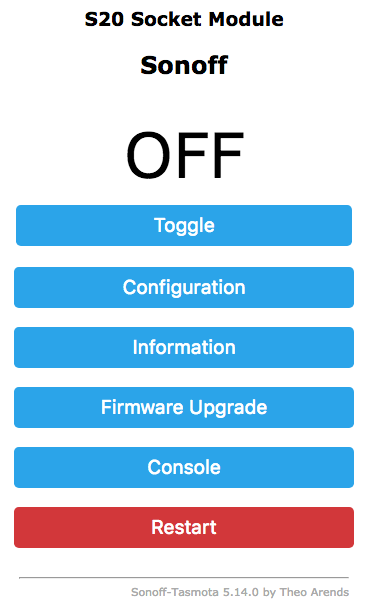
Tasmota main menu page
Peruse the list of Tasmota commands at your leisure, though you'll probably only be interested in "Power on", "Power off", and possibly "Power toggle":
http://sonoff.local/cm?cmnd=Power%20toggle
http://sonoff.local/cm?cmnd=Power%20on
http://sonoff.local/cm?cmnd=Power%20off
The Tasmota firmware also comes with its own timers, which you can configure via the Web interface under "Configuration".
From outside your home WIFI
How to control the Sonoff from outside your home WiFi depends on your own setup. I have not progressed to this stage yet, but there are a number of options, the easiest of which would be to enable port forwarding on your home router to allow you to access the various Sonoff devices by targeting different ports on your home router. This may not be the safest option though!
Another option would be to have a remote proxy do some of the heavy lifting as mentioned in this Tinkerman post.
Troubleshooting
The only issue I had once was transposing the RX and TX wires, which was easily solved by trying again with those two wires the other way round.
See the Tasmota Wiki for further troubleshooting tips.